
TFQA: Tools for Quantitative Archaeology
kintigh@tfqa.com +1 (505)
395-7979
TFQA Home
TFQA Documentation
TFQA Orders
Kintigh(ASU
Directory)
|
TFQA: Tools for Quantitative Archaeology |
TFQA Home |
Page TitleLDPLT: Local Density Analysis Plots Program LDPLT creates screen and hard-copy graphical plots of the results produced by program LDEN. It plots the local density coefficient for any pair of types (including a type with itself) against radius (Figure 9). Any number of pairs may be simultaneously plotted, but there is a practical limit on how many pairs can be plotted and really seen.
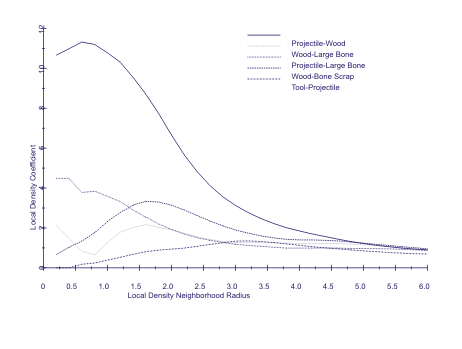 Figure 9. Local Density Analysis of Mask Site Artifact Classes, Intertype Coefficients Computer by LDEN and Output by LDPLT. Figure 9. Local Density Analysis of Mask Site Artifact Classes, Intertype Coefficients Computer by LDEN and Output by LDPLT.
RUNNING LDPLT You can produce screen and plotter plots on the same run. Because this program runs very quickly, you should preview program results on the screen before plotting them (which takes a little while). To run the program, type LDPLT, or LDPLT <file> where <file> is the name of the .PLT file produced by LDEN. The program prompts you for labeling and scaling information and then produces plots that can be viewed on the screen and optionally plotted on a plotter or saved for incorporation in a Word Perfect document. (See the section "HARDWARE SUPPORT" under "Program Conventions" above. SEQUENCE OF PROGRAM PROMPTS Data File {.PLT} ? Enter the name of the LDEN plot file to be displayed. Reading 56 Observations with 4 Variables 56 Points Read Report on input progress. Plot to HPGL Plotter or HP LaserJet Printer {N} ? HPGL Output to (PRN, COM1, COM2 or <filename>) ? HP [L]aserJet 3/4 or Plotter Paper Size: [A] 8.5x11 [B] 11x17 {L} ? Enter Y to the first question to produce a hard-copy plot. If Y is entered, the program prompts for the file or device name, either a regular file name, PRN, COM1 or COM2, depending on what port the printer or plotter is connected to. If you're using a HP Laserjet III or above printer reply PRN. If you're going to import the file into Word Perfect or another program, reply with a file name. You then select L for HP Laserjet III (this does not work for other Laserjets) or A or B for the plotter paper size. If you will incorporate the plot into Word Perfect, enter A or B, not L; the paper size does not matter. Plot X Axis on a Log Scale {N} ? X Values Range from 1.00 to 2.00 Xmin {1} ? Xmax {2} ? The program asks if you want the x axis (radius) plotted on a log(10) scale. Usually one does not. It then tells you the range of actual X values prompts you for the range to plot. Often a better-looking axis label will result if the range is further rounded. The program then prompts for the same information regarding the Y axis. In the case of the Y axis, the minimum value should usually be 0. It will sometimes be useful to set the maximum below the observed maximum (usually at small radii) where very high values occur in order to get a better view of the higher radii. Plot Title ? The title placed on the plot. Specify Pair of Types for Local Density Plot: Valid Types Indices: 0 2 4 10 11 12 13 Note: The row type may be the same as the column type. Row Type Index ? Col Type Index ? Plot Character for Line 1 (<space> for none) {1} ? Legend Label for Line 1 {Type 0-0} ? Include Another Type Comparison on this Plot ? The program then asks you to specify the type pairs to plot. Any number of comparisons may be plotted on the same plot, but it is often difficult to follow more than about four. Include Legend on Plot {Y} ? The program will, optionally put a legend of line types on the plot. At this point the plot is displayed (Figure 9). Hit <Enter> to continue or <Esc> to exit the program immediately. Replot Data {Y} ? At this point you may go back and plot other pairs. Elapsed Time: 1.91 Minutes End LDPLT |
| Home | Top | Overview | Ordering | Documentation |
| Page Updated: 5 February 2026 |